Sovol SV06 Inline BLTouch mount
Sovol SV06 Inline BLTouch mount STL and klipper setup instruction
- Download
- Print instruction
- Required hardware
- Klipper config changes
- Context
- Symptoms
- Design choices
- Frequently Asked Questions
- Photos
- Credits
View the Project on GitHub ruthrsc/Sovol-SV06-Inline-BLTouch-mount
Download
https://github.com/ruthrsc/Sovol-SV06-Inline-BLTouch-mount/releases
Print instruction
- 0.2 layer height
- 20% infill should be enough. 100% for stability - it increased print time by 50% (from ≈an hour to ≈an hour and a half)
- Depending on your adhesion, it might require a brim
- No supports needed, print with two slots part laying flat on the bed
Required hardware
- 2x M3 6mm bolt - for the mounting probe to bracket
- 2x M3 nuts - provide attachment points for 6mm bolts
- 2x M3 8mm bolt - for mounting bracket to the extruder assembly
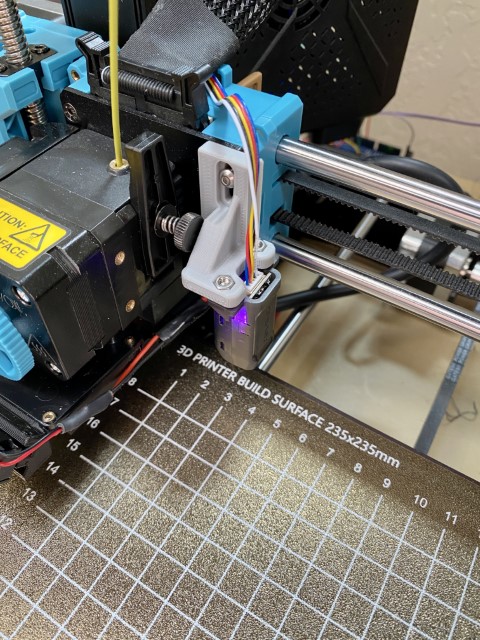
When installing, if you flush the bracket with top of X-axis extruder assembly, proble should sit at ≈2mm (recommended height) higher than nozzle.
Klipper config changes
[stepper_x]
position_max: 208

[bltouch]
# Adjust pins if needed
#sensor_pin: ^PB1
#control_pin: PB0
x_offset: 45
y_offset: 0

[safe_z_home]
home_xy_position: 69, 118

[bed_mesh]
mesh_min: 45, 28.5
mesh_max: 190, 186.5
Context
X-axis twist is a problem that can occur in certain 3D printers. Printers with two linear rods on the X-axis (like Prusa MK3S+ or Sovol SV06) often suffer from that problem. The twist can affect the accuracy of the probe’s measurements, leading to errors in the printed object’s dimensions and surface finish.
Probes are located on the side of the extruder and in different positions than the nozzle. The firmware is programmed with a probe offset to adjust the height based on the nozzle’s position in relation to the probe. However, when there is an X-axis twist, the probe may measure a different distance from the bed than the nozzle at the exact location. This problem can be worsened if the probe is further away from the nozzle on the Y-axis.
This can cause inconsistent or inaccurate readings, resulting in poorly calibrated printers and suboptimal printing results.
Symptoms
- Inconsistent layer height: X-axis twist can cause the printer’s Z-axis to move up and down at varying heights, resulting in inconsistent layer height throughout the printed object.
- Warped or skewed prints: X-axis twist can cause the printed object to warp or skew, resulting in distorted or unevenly shaped prints.
- Poor bed adhesion: X-axis twist can cause the nozzle to be too close or too far from the print bed, resulting in poor bed adhesion and failed prints.
- Inaccurate measurements: X-axis twist can cause the printer’s probe to inaccurately measure the distance between the bed and the nozzle, resulting in poor calibration and inaccurate measurements.
- Rough or uneven surface finish: X-axis twist can cause the printer to print too close or too far from the bed, resulting in a rough or uneven surface finish on the printed object.
Ways to address the problem
- physically align the printer by taking apart and reassembling the Z-axis components. It’s essential to torque the screws gradually, doing a little at a time and alternating between screws holding a part to avoid binding. If everything is straight and there are no inconsistencies, this should align the frame and reduce or eliminate the X-axis twist problem.
- Enable and calibrate X twist compensation in the firmware - depending on how technical you are, there might be other options than this one.
- Relocate the probe to be in line with the nozzle.
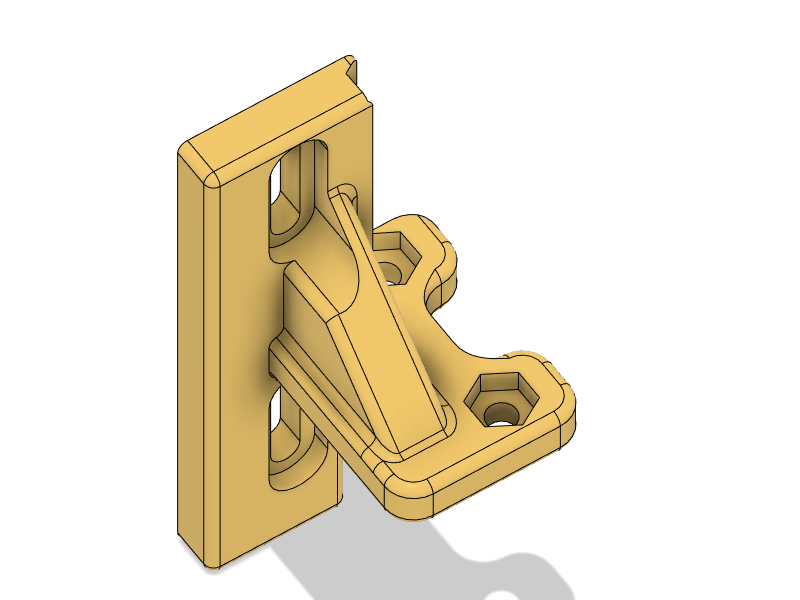
Design choices
The good
- Aligns probe with nozzle axis, reducing probe error. A more accurate probe will help with bed leveling and first-layer setup - resulting in more consistent prints
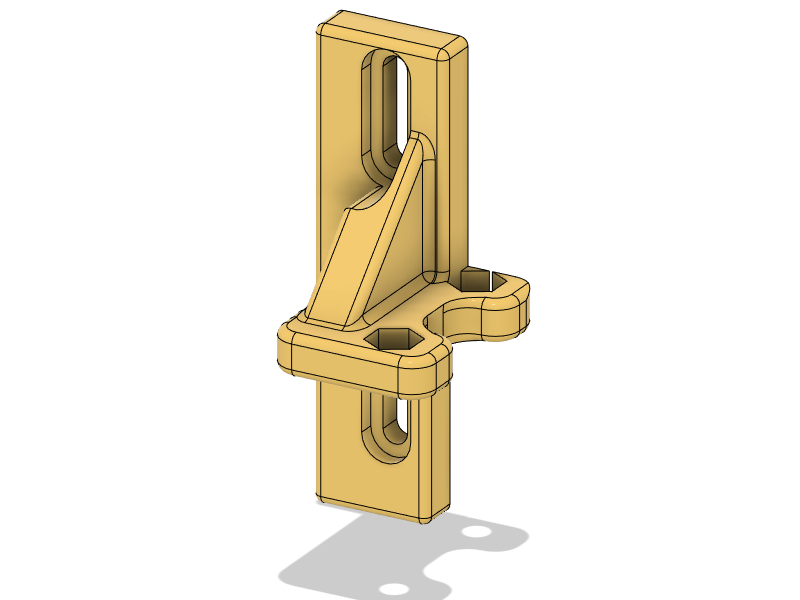
- Attaches to existing M3 screw holes
- +5mm/-5mm bracket height adjustment
- 5mm thick, sturdy bracket design
- Works with stock and SV06 5015 Fan Duct from NAM1025. Possibly others.
- comes with .f3d, .stl and .step files for remixing
The bad
- Probe sticks out to the right of the extruder. The biggest drawback is minimum X probing position is ≈45mm. This means you won’t be able to measure 45mm left side of the bed. If you know your bed is warped within that area, this mod might not be for you
- Probe location also affects how far the extruder can move before hitting the frame. In my experiments, the safe distance was to ≈200mm. Look for a different solution if you need every estate piece on the print bed, but it should be ok for most prints (especially if it helped you fix the X-axis twist).
- Although there is ≈2-3mm clearance from the extruder filament tension knob, the bracket reduces access to it.
Frequently Asked Questions
- Can you provide instructions or compiled firmware for printer X?
- Unfortunately no. I converted my SV06 to Klipper and found it better for my use cases than Marlin. It should be relatievly easy to adopt klipper changes I specified to Marlin or other firmware.
- Why did you replace the original probe with a BLtouch type?
- I thought my bed was badly wrapped during my fight with the X-axis twist. To mitigate that, I put a glass bed plate. The original sensor requires a metal bed, so I replaced it with a CR touch. After leveling, i saw the printer reported a similar mesh-like original bed, so I realized something else was happening (X-twist!). Since then, I moved back to metal PEI plate - it's easier to pop the parts out quickly. However, now I can switch the plate to any material. Also, with a BLtouch type sensor, it's impossible to crash head into the bed if there is no metal plate on it (happened to a "friend")
- Why there is a small gap on the nut cutout?
- The design went through a couple of iterations (and took way more time than I wanted to). I quickly adjusted the dimensions to get a probe as close to the nozzle as possible when the last iteration caused a 0.375mm cut out beyond the bracket perimeter. To fix it, I would have to offset the probe from the nozzle, but the point of this project was not to do that. Another option is to add material behind the gap, but if I do it on the entire face, it will offset the nozzle again. It looked out of place when I tried to add 0.1-0.4 to the gap location. So considering all that, I decided to leave the gap.
Photos
Credits
Inspired (but not copied or reused) by work of HeyMoe! - https://www.printables.com/model/382057-bltouch-cr-touch-mount-for-sv06